
How to Get Started With User Story Mapping
Do you remember your very first software project? I remember. I was a Product Manager back in 2014 and it feels like it was yesterday. Unfortunately, I didn’t know how to prepare and define a project with story mapping. Nor did I have any clue how to define the product scope or a minimum viable product.
Let’s look at some “fun facts” from that project:
What needed to be built? An “In-App-Browser” function for iOS and Android shopping apps (native functionality wasn’t as good as it is these days).
Why? Because of missing functionality.
For whom? All our customers.
By when? ASAP (yesterday).
How? “Christian, that’s what you need to figure out…”
… That was the CTO’s statement back then.
Sounds clear enough, right? All questions answered? Ready to start?
No? 😳
What do you mean by “this project is not defined SMART”?
Ok...
...before we get lost in this particular project, let’s look at projects in general from a birds-eye view with our Product Management glasses. Projects can be very complex, and each project has different stages and requires certain information, frameworks, communication, and more. Story mapping is the part of the process where you (ideally) know what the problem is and why it exists.
This article will focus on the creation part of a story map. You’ll read more about product discovery soon in other blog posts.
I’ve been inspired a lot by the inventor and author of “User Story Mapping” - Jeff Patton as well as the Agile Consultancy Agile42. Next, I’ll share with you how I used to create story maps and how I’m teaching to execute them these days.
The Basics and 3 Levels of a User Story Map
A user story map is a collection of user stories assigned to different activities that are related to different types of personas. This map represents a feature or product flow or even bigger a whole initiative or opportunity.
It’s a workshop-based methodology to map out how users navigate and use a product, service, or feature. Story mapping helps to define a narrative flow and to define based on that multiple solutions/options, which in total will be defined as the MVP, release, etc.
After all activities and user stories have been defined it’s easier to define a minimum viable product/first release version. The whole process helps to build the right product as well as ensure that things are built the right way.
Level 1: The User Types/Personas Start the Story
A story map will always be read from top to bottom. Therefore, the story starts with a user type or persona (further: persona). If your company and Product Team are already working with personas, you can reuse them. If not, you can create a new one. Adding one or two sentences to each persona makes it easier later on to remember and explain it to the audience. 🤓
Keep in mind, that a persona doesn’t exclusively need to be an external user or customer. You can also define internal personas like: “Platform Admin Greg”.
Level 2: The Activities Make the Story Map Flow
The activity flow represents the backbone of a story map. It describes all activities one or multiple personas do within the scope of a certain feature, action, product, etc.
Let’s look at a simplified real-world example:
Imagine Apple Pay doesn’t exist yet. We’re Apple Product Managers and want to build a story map for the new functionality/feature. We’ll start with the functionality of setting up Apple Pay on your phone with a credit card.
An activity flow could contain steps like:
Persona “iUser”
Unlocks the iPhone
Enters the wallet app
Adds a new (credit) card
Reads the introduction text & continues
Enters the credit card data
Reviews the data & confirms
Accepts the Terms & Conditions
Makes the first successful transaction
Example: Story Map Backbone With Persona(s)
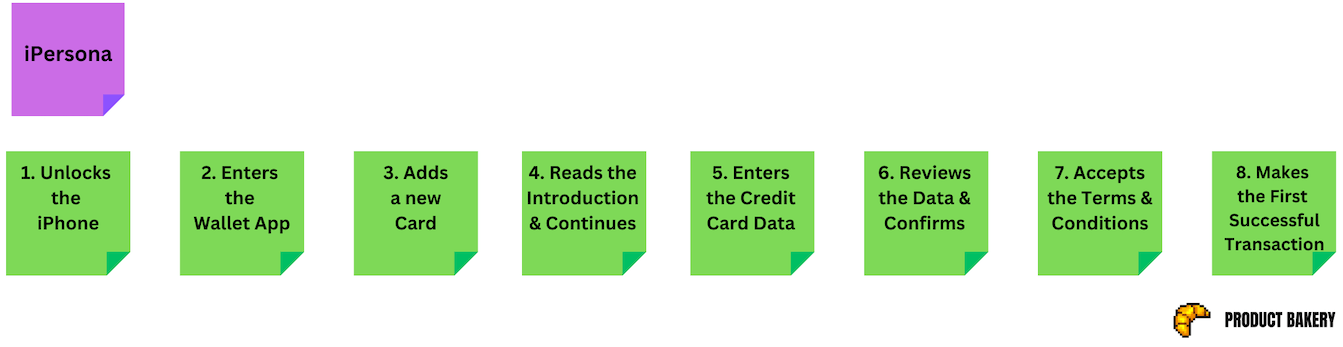
Note: If the backbone is “final” I recommend always adding numbers to it. It makes it easier if you present it to stakeholders or team members to follow or to make comments on a particular item. The same applies to user stories/options.
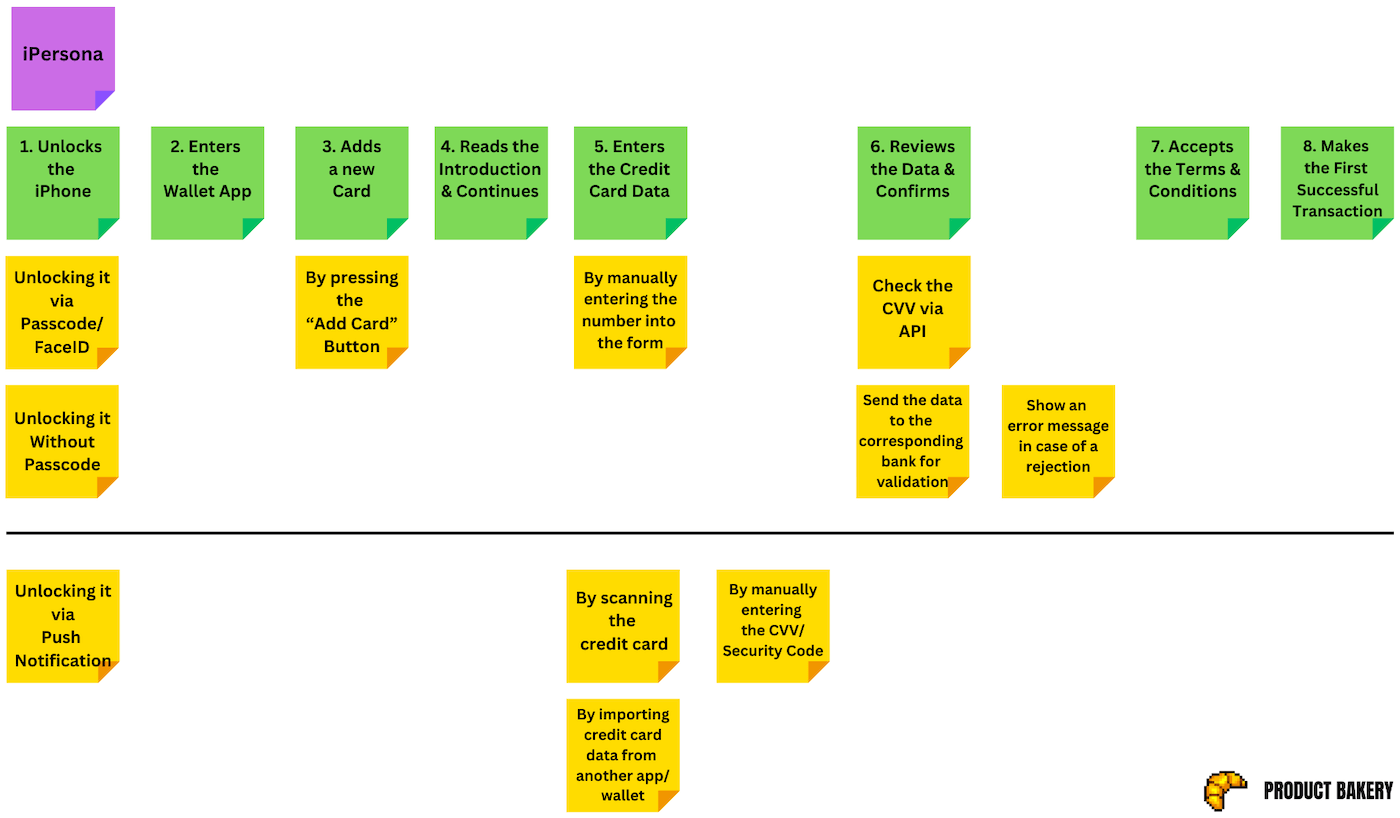
Level 3: The User Stories or Options are for Your Backlog
Each activity can belong to one or more user stories. Alternatively, you can call them“options”. For example, let’s take a look at activity 1: “Unlocks the phone”.
The activity itself is formulated “openly” in order to leave room for solutions. There could be many ways to unlock the phone:
via Passcode or Face ID
without Passcode
via a push notification
...enter more ideas here…
Number 1 & 2 are already existing functionalities. You shouldn’t hesitate to add this as well in order to see the bigger picture. It’s possible that the “Unlocking via Passcode or Face ID” story is part of another story map as well.
What about number 2? 🤔
Obviously, the functionality to send and receive push notifications is something that exists already. However, a push notification that highlights the Apple Pay feature and opens the wallet if you press it, doesn’t.
You’ll need to define what countries this notification appears in, the text that’s shown and languages/translations, etc.
Another great example is activity number 6. Enters the credit card number. Here are some further options:
By scanning the credit card
By manually entering the number into form fields
By importing credit card data from another app or wallet
...enter more ideas here …
What about technical stories or options? 🤔
Activity 7 “Reviews data and confirms” sounds straight forwards. A story to consider is them checking the security code via API. At the same time, the data needs to be sent to the collaborating bank. In the event their card is declined, there needs to be a specific message and reason for the decline.
As you can see, there are many things to consider. If you present that later to your team they’ll decide how to solve these challenges or identify even more things you haven’t considered.
Example: Full User Story Map

Note: Stories/options can have multiple steps. E.g. Scan the credit card + entering the security code in activity number 5. Not every activity necessarily needs to have related user stories/options. The goal of the activities is to visualize the whole user flow. There are many more options to consider. Bear in mind that this is a simplified example.
Adding a number to the stories is something you should definitely do at the very end otherwise you’ll need to touch every card again in a worst-case scenario.
What a User Story Map Isn’t
So far, we've drafted a basic outline of the user story map. However, it's crucial to understand what a story map isn't. It isn't a design document. While it describes how users navigate through the product or feature, it doesn't specify its future appearance. Yet, the story map serves as an important tool for Product Designers, providing clarity on what needs to be designed and developed into a solution.
How to Build a User Story Map in an Agile Way
One of the key learnings I’ve made is that story mapping in particular is a team effort. For sure, the number of people involved depends on many factors like company size, team size(s), the domain & context as well as the team structure.
In my opinion, a group of 3-7 people works best. As a Product Manager, I usually invite 1-2 other PMs as well as a Designer and some Engineers. In case the feature/product requires specific domain knowledge I invite stakeholders as well.
Setting up the Story Mapping Tools
Whether you’re onsite or remote, make sure you add an agenda to the invitation. I usually block 2 hours in our calendars for story mapping. My standard part of an invitation looks like this:
Agenda:
Presentation of the feature/initiative
Questions and answers
Introduction to story mapping
Story mapping
Review and action items/next steps
Onsite preparations:
If you’re doing it in person make sure you:
Book a room with a whiteboard
Prepare the information on what to build
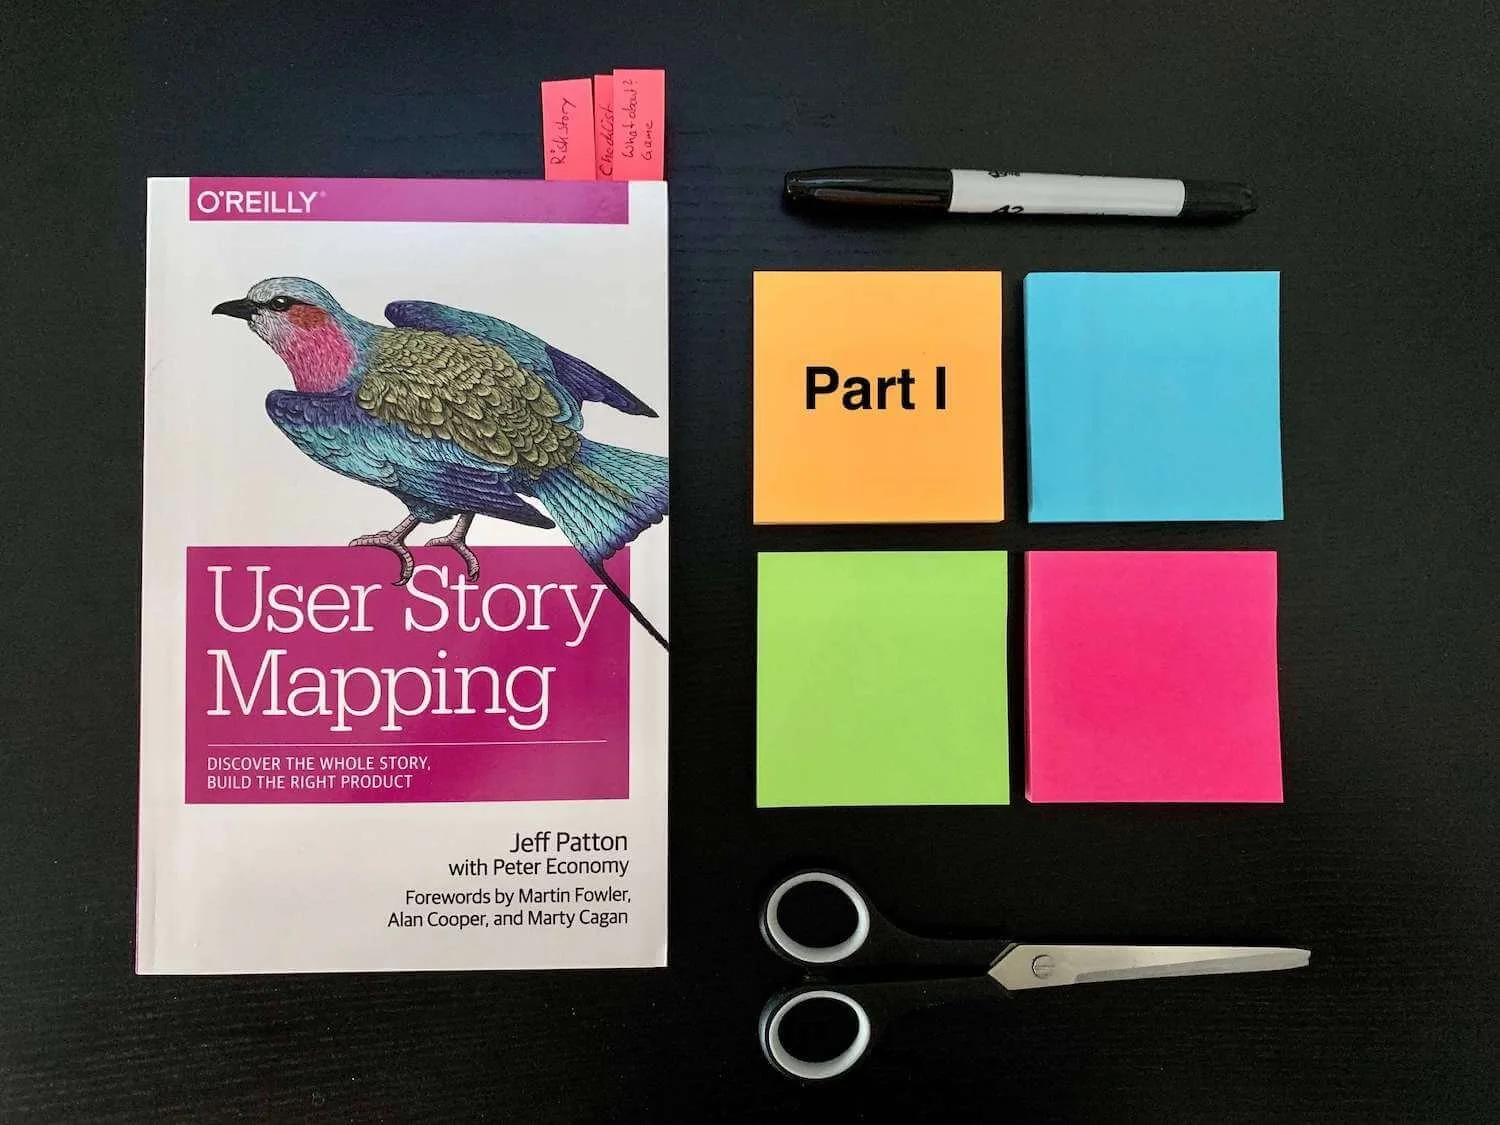
Prepare sticky notes in at least 3 different colors + pens
Remote preparations:
Share all relevant information and links in the invitation like:
The document that explains the product/feature
The link to the remote story mapping tool
A link to a document for notes, open questions, and action items
Hint: Last time I tried using a story mapping tool which didn’t match our expectations back then. Since then, I have used Google Spreadsheets which is, in my opinion, an awesome tool. You can use the comment function perfectly to add additional information to a user story. Here you can find the template that I use. Feel free to make a copy of it and reuse it. 👉 Click me 👈
In case you’re looking for a more professional tool with a great Jira integration I can recommend https://avion.io which I’ve been using since mid of 2019.
🎙️ Check out the podcast episode about user story mapping with very practical tips not mentioned in this article:
Kicking Off the Story Mapping Session
The very first thing the Product Manager should do is to pitch the project/feature. Make sure you explain the “why” and underline it with relevant data you’ve collected.
I usually prepare either a business canvas or an epic that contains all relevant information and cases.
Make sure the goal is clear and all important questions have been answered. If there are open questions you can add them to the “Parking Lot” on the whiteboard (onsite) or in the document (remote).
User Story Mapping Process
The first goal is to build the backbone. That’s why I always start with the activity flow and personas. Here is one tip: When your story maps a new product or a big feature, try it out starting at the end of the process. Ask yourself what’s the very last thing that’ll happen.
Example:
Imagine you want to build a pickup in-store feature for an online shop. You buy and pay for products online and you grab it from your local store.
What’s the last thing that happens?
The customer (Persona C) leaves the store with the ordered goods
From there on you continue going back:
The store associate (Persona S) hands over the bag with the goods
The store associate (Persona S) finds the data of the customer in the systems
The customer (Persona C) showed the store associate the pick-up receipt
...
I like starting at the end because it keeps the group focused and you reduce the risk of getting off-track.
It’s important to regularly review the activity stream. Always start from the end and review it with the whole group. It’s totally fine and normal to adjust and change it. That can even occur when you’re working on the user stories/options.
You can also start from the beginning with, for example;
The customer (Persona C) places an order….
...
-> The moment you start thinking about and discussing the activity flow is the best part of the story-mapping process in my opinion. During this stage of the conversation, people start using their minds and creativity more. Besides many good and heated discussions, you also start building a common picture as a group. That fosters the team’s bonding.
If you have a first version of the backbone/activities you can start thinking about solutions/user stories. From that moment on you can start at the beginning of the activity stream. I recommend describing user stories as well as possible. Instead of naming it "with passcode" you could call it "Ability to unlock the home screen via a passcode".
This makes it
a. easier to understand for people without a background
b. and you can easily use this title as the headline for the future user story.
Defining Your Minimum Viable Product and Drawing a Line
After you’ve mapped out many user stories and options it’s important to decide which ones to build first. Ideally, together with technical people, you can find a good mix between how to deliver the “biggest value” to the customer and what is technically achievable in the “shortest time.”
Example: Full User Story Map With MVP/MMF
Note: In case you have more cards further down you can draw another line for the next release.
Let’s Sum Up the Story Mapping Guide
A story map has three different levels: persona, activity, and user story/option. You always read a story map from top to bottom. You start creating the story map with the backbone (persona & activity). Start at the end of the flow and work yourself back to the beginning. Next, you define all possible user stories and options. Then you decide what’s part of the first version of MVP/MMF (minimum marketable feature).
Getting started with story maps takes some time and isn’t easy. From the moment it becomes a key part of your product development process you’ll never want to miss out on it again.
One more thing!
If you want to know how to make story mapping part of a product development process continue reading here
👉 MVP definition with user story mapping or…