
Create Impactful User Flows and MVPs With User Story Mapping

Are you tired of continuous scope changes and never-ending projects without clear ETAs? Or, are you frustrated by stakeholders constantly asking, "WHEN IS IT DONE?" without receiving a clear answer from your team? If so, keep reading!
This blog post shares deep insights on the user story mapping process and how you can use it as insurance to plan and deliver your upcoming features well-scoped on time.
First, let's dive into the basics of user story mapping:
User story mapping is a workshop-centric methodology where you map out user activities. These activities can be performed in specific ways, which are user stories or “options.”
This methodology brings people together! A group of Product Managers, Designers, Engineers, and Domain Experts (stakeholders) is perfect for mapping out and planning a future product, feature, or service.
The goal is to develop a common understanding of how the user interacts with the product before developing or designing it.
On top of that, all created user stories will be added to the backlog which makes planning faster and more efficient.
There have been many occasions where I’ve started preparing or even developing products without knowing enough about the user’s needs and activities...
… that’s why I’ve created this blog post to help you avoid the mistakes that I made.
We’ll focus on:
Understanding your user journeys
Identifying gaps and dependencies faster
Prioritizing stories collaboratively
Crafting streamlined backlogs
Communicating product ideas, MVPs, and releases more effectively
There’s one more thing I need to let you know...
The only way to learn user story mapping is by doing it. Take one of your current features, write down the user's journey, and start breaking it down into single steps from start to finish. Remember to include all the possible steps, whether all users take them or not!
Once you’ve mapped out your first feature, you’ll start seeing the benefits.
Prepare Your Feature and Story Mapping Session
First, we’ll focus on preparing two things:
The product/service/feature
The story mapping session
These two topics are vital if you want a successful outcome. Remember this quote:
“By failing to prepare, you’re preparing to fail.” - Benjamin Franklin
Start With Your Feature Preparation First
Before you hold a story mapping session, you need to know what topic you’ll be working on. That’s why you’ll need to prepare the product/feature (further called: feature).
Once you pitch the feature to the attendees, they might have some questions. Make sure your feature is as prepared as possible and cover things like:
The problem statement/objective
Business value
Involved personas/customers
Success metrics
Scope (if possible)
Dependencies (if you know some)
and more.
You can find all the information you’ll need about feature preparation in my article about 👉 User stories and epics 👈
I always prepared either an epic or I use a canvas to visualize the project.

The better you prepare the feature, the better the outcomes of the session.
Then Initiate the User Story Mapping Workshop
The workshop preparation starts with inviting the right people. I’m a big fan of smaller groups. I recommend not working with more than 7 people.
Note: Feel free to start with a smaller group and an “easy”/small feature.
The team setup can be different depending on your organizational structure and company size.
Here’s how my typical invitation list looks:
2 Product Managers/Owners
1 Product Designer
1-2 Domain experts (stakeholder)
1 Senior Engineer/Architect
1 Marketing Manager or Researcher (both optional)
Once I know who’s attending, I create an agenda for the meeting which can look like this:
Hi All,
In today's session, I'd like to pitch & map out “OPU-592 Apple Pay Checkout.” Please check the documentation beforehand:
www.name.atlassian.net/wiki/spaces/EN/pages/project+name-OPU-592
If you have any questions or feedback feel free to reach out to me.
Agenda:
Defining a notetaker
Feature pitch Apple Pay checkout (10 minutes)
Q&A (5-10 minutes)
Story mapping (60-90 minutes)
Defining follow-up & next steps (5-10 minutes)
Looking forward to seeing you soon.
Best,
Christian
If you hold the session in person make sure you book a room with:
Electric Tape (for the MVP/release lines)
Snacks!
If you do it remotely, make sure you have set up all the tools. I’ll talk about tooling later as well. What’s important for you though is to take a short look (again) at this article to remember the basis of:
👉 How to get started with user story mapping 👈
Manage Your Story Mapping Session Like a Pro!
Now it’s time to look into the whole methodology and science behind user story mapping.
In this chapter, we’ll have a look at:
Pitching the feature
Dealing with multiple user flows
Business processes & technical features
Kicking off your session:
If you’re story mapping for the first time, it’s crucial to explain to everyone what it is and how it works. Ideally, you do this before the session.
I’ve created a slide deck that I use when I coach people. Feel free to copy and reuse it. 😉
Link: Intro - User Story Mapping
Let’s jump to the feature pitch!
1. Pitching Your Feature to the Story Mappers
It’s essential to nominate a note-taker who writes down feedback and questions at the beginning.
All open questions for the whole session should be added to a “Parking lot.” In the end, you can decide who follows up on specific subjects with an ETA.
I like timeboxing the pitch, including Q&A, to max. 15 minutes.
If you need more time, the feature is very likely not ready to be “story mapped.”
The 15 minutes is a suggestion. You decide how much time you want to spend on this.
If there are too many questions or they’re all critical ones that can’t be answered, I recommend stopping the session! Continuing without enough data is a waste of time.
Once you’re all up to speed and aligned on what to build, it’s time to start with personas and activities.
2. Deal With Multiple User Flows and Complexity
In “How to get started with user story mapping” I outline the basics of story mapping for customer-facing features.
A user story map shouldn’t only reflect the “happy path” but should also examine what’s referred to as “edge cases” too. In my article, I use the example of adding a credit card. You have 3 different possibilities:
Accept (happy path, the card will be added)
Correct (you need to edit the data)
Reject (card not accepted, start again)
Every flow is different and might involve different personas and processes. Therefore, I recommend separating them like you separate your MVP and further releases. In the case of activities, you do this on a vertical level.
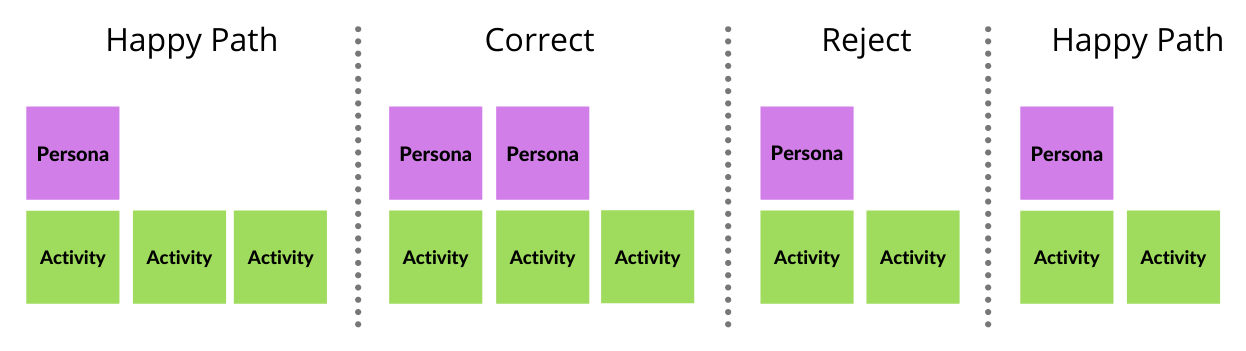
When you present them to stakeholders, you can hide/collapse the edge cases and start, for example, with the happy path.
If you don’t manage to cover all edge cases, don’t worry. You have a smart team that’ll review and challenge the story map.
3. Visualizing Business Processes & Technical Features
Sometimes a user or persona can be “technical” like a 3rd party. These external or internal systems handle certain business processes.
It can be very helpful to visualize them in order to map out the full process. That helps Engineers and Product Managers to fully understand how the feature will work.
Nevertheless, it shouldn’t be used to define complex backend processes. It’s the job of an Engineering Team to think about a solution. Everything else is a waterfall approach.
The Apple Pay example from my article didn’t include any technical personas and business processes. However, the payment service provider plays a key part in the whole flow/process which I have visualized below.
System Personas & Technical Processes:

Note: I’ve no idea how Apple’s backend works. This flow is just an assumption for visualization purposes.
Recently, I coached a team (working in fintech) that was building multiple backend features. They just got started with user story mapping and had an overall low amount of product documentation in place.
The very first thing we did was “story” map the existing functionality in order to develop an understanding of how the business and backend processes work. This helped the Product Team immensely when it comes to understanding how the systems work.
We also reused and built upon these story maps with all new functionalities.
Conclusion: It can be helpful to include technical or 3rd party/system personas to visualize business processes. It shouldn’t be used to design backend processes.
The next chapter will focus on my favorite part of the process: MVP definition! And for sure there’s some further read on that topic as well: 👉 How to define an MVP with user story mapping 👈
Define Releases That Match With Your Product Strategy
By this point, you should have an understanding of most of your personas and have a backbone in place for your activities. Now we need to start building out our map vertically by adding user stories.
Think of more user stories/options rather than less. You can always scope them out!
Once your user stories are specified, you’ll define the minimum viable product (MVP) or minimum marketable feature (MMF). But the work doesn’t end there.
Drawing the line means deciding on what’s in and what’s out.
You might scope out functionality for the first version that’s needed to be competitive, compliant, etc.
Therefore, we’ll have a closer look at the whole MVP and release planning process to ensure you hit your customer and market needs.
Drawing the MVP Line on Your Story Map
I always draw the line twice. Check out this short video where I demonstrate how I draw lines.
Firstly, with the group that created the story map and secondly with my Engineering Team.
Let’s take a look at the first MVP definition.
Many people believe that an MVP only contains the very bare minimum functionalities. It’s often referred to as a “Skateboard.”
Nevertheless, you can’t always launch the bare minimum of what makes a feature “work” or the skateboard “roll.” There needs to be more substance.
That being said, if you want to launch something fast and learn along the way, building a skateboard is fine.
If you're working with a well-established product, I recommend making sure the MVP covers key functionalities that customers expect and ones that make you a viable competitor in the market. Especially in B2B!
Here are the Product Management skills you’ll need! You and your team must be fully aware of the problem you want to solve and the business goal(s) you wish to achieve. Make sure everyone is on the same page.
I always use the second round to review the MVP with the Engineering Team. They know what’s best, what can be built fast, and what’s going to take more time than expected. The insights I gather from my teams help me to better prioritize and achieve a faster go-to-market.
On top of that, they’ll help you to complete the list of stories if you missed any. 😉
Sleep Better With Planned Upcoming Release
All stories that didn’t make it into the MVP will fall into further releases. Therefore, you’ll need to have decided what’ll be shipped in the second, third, fourth iteration, etc.
Most teams correlate upcoming releases with sprints, iterations, or release trains. And that’s fine. Nevertheless, I’d like to share some advanced thoughts on that with you.
Do all stories that are defined need to be shipped at once? Or, can you launch increments of the “release” that deliver end-to-end value once they’re ready?
That depends on the product you’re building and on your technical infrastructure (continuous deployment, etc.).
I work with a gaming company that always defines user stories in a way that they can be shipped independently. Once all stories are in production, they tick off the “release.” ✅
I found it very inspiring, helpful, and worth sharing with you.
Note: This brings us back to using the INVEST framework for user stories and another good night read: 👉 How to break down features before you start developing 👈
Make Them Want Your User Story Map to Come to Life
Previously, we touched a bit on the topic of discussing the story map with your team. Now, we’ll dive deeper into that as well as how to get stakeholder buy-in.
FYI: This is a great podcast episode about user story mapping with some useful tips & hacks
Pitching and Breaking Down The Story Map With Your Team
Once you’ve created and aligned the story map with the workshop team, you’ll need to get input from your Engineering Team. I believe it’s important to have a good structure in place to share the story map with your team so you can get the best possible results out of it.
Depending on the feature size, I’d recommend at least 1 hour to cover 3 key points:
Point #1: Pitch the Feature
Since you’re used to it now, it shouldn’t be a biggie. 🙂
Point #2: Pitch the Personas and Activities Without User Stories
I always hide all stories/releases and start with the personas and narrative flow (activities) first. I like going through it before I answer questions. If the map is very long, I have a break in between and ask if anybody has any questions or if anything needs further clarification.
Point #3: Share the User Stories and Make Break-out Sessions
Next, I share all the user stories on the screen. The fun part is that I don’t explain them. I let the team split up into groups and select parts of the story map they want to analyze.
The result is that they come up with:
Questions or confusion, which is good!
Feedback to improve the map
Other stories that need to be considered
Potential dependencies they’ve discovered
Additional technical work that needs to be done
Depending on the story map size, I do either one or more breakout sessions for 10-15 minutes.
I highly recommend trying it out. The results of your team will be outstanding.
Alternatively, you can go through the user stories with your team one by one.
The Tough Part: Getting Stakeholder Buy-In
In large companies, such as B2B enterprise businesses or agencies, it’s essential to get the buy-in and feedback from stakeholders. As much as we don’t like it as Product Managers, sometimes other people do have the last say.
In smaller companies that are used to user story mapping, sending an email with the link to the epic (feature) and the story map can be enough.
In larger or more complex environments it’s necessary to pitch it in a meeting. I recommend pitching it with at least two people together. One presenter (usually the PM) and one note-taker. Doing both can be very challenging and overwhelming.
You can follow the same 3 points without the story breakdown. Stakeholders should mainly give feedback on priorities or provide feedback you can follow up on offline.
Don’t fall into the trap of discussing user stories in-depth or how the future UI should look.
That can happen quite fast if you pitch it to a passionate founder for example.
If you managed to pass the pitch and got the buy-in, you truly mastered the whole user story mapping process! Well done mate! If you are still up for one more little hack keep reading! Here comes the tooling part I promised…
Final User Story Mapping Tools and Tips for You
I like onsite meetings the most. Nevertheless, more people than ever are working remotely these days. That’s why it’s crucial to have good tooling in place for
Remote Collaboration
Good Documentation
Project Management
I’d like to share with you how I deal with tooling and how I make sure to keep the key information for Engineering Teams all in one place.
Collaborating Remotely on Your Story Map
In a remote story mapping session, it’s good to have one person who shares the screen and creates virtual sticky notes.
For a long time, I used Google Spreadsheets which isn’t a bad solution. Spreadsheets give you the freedom to design things the way you want and the comment function is very helpful too. Another benefit is that everyone can collaborate on it in real-time.
During the activity creation, it’s important to keep all team members involved. There can be instances where some people with a clear picture or strong opinions dictate the whole flow (in remote sessions even more than onsite ones).
I recommend that as a Product Manager, you regularly ask team members directly about their opinions to make it as interactive as possible. Helpful questions to ask people or the group are:
How do we/you feel/think about that (e.g. flow)?
What else could the persona do?
Did we/you miss something?
Are we/you sure that no more steps are happening?
These are some simple but engaging high-level questions I always like using. I’m sure you’ll know much more than I do.
These tips can help to get the most out of a remote or onsite session.
Documenting Your Processes, Flows, and Outcomes
Unfortunately, story maps don't look nice or clear in spreadsheets. Besides that, it’s not connected to Jira or any other project management tool.
I tried multiple story mapping tools over the last 4 years, including the latest story mapping functionality from Miro.
Most of them miss needed functionalities or haven’t got good Jira integration.
At the start of 2019, I found Avion.io, which I liked the most out of everything I’ve used so far. The UI is clean and simple, and the best thing is it pushes and pulls tickets from Jira.

Once you’ve created activities and user stories, they’ll be pushed into your backlog. If you change them the changes will be pushed back.
That means your story map will always stay up to date and become a reliable and updated source of documentation. On top of that, you don’t need to create tickets manually in Jira anymore. Win-win.

This can be very helpful if you want to story map your whole platform and have all story maps in one place plus a smooth connection to your product backlog.
Here’s a short YouTube video of Avion.io👈 Feel free to give it a try!
If you have good experiences with other tools please let me know. I’m always happy to experiment with new solutions.
I know this was a long read… Let me know how you're progressing and let's chat on LinkedIn!